19 Top White Label SEO Tools for Agencies
Building a great tool requires significant time, effort, and resources, as I have discovered through launching my own SEO tools.
List of top white label seo tools
- Seranking
- Semrush
- Webseo
- Woorank
- Mysiteauditor
- Rankranger
- Reportgarden
- Accuranker
- NightWatch
- Wincher
- Dashthis
- Reportz
- Sitechecker.pro
- Siteauditor
- Posirank
- Cyfe
- Seoptimer
- Brightlocal
- Agencyanalytics
Attempting to be a jack of all trades often results in being a master of none. If you are reading this article, your area of expertise is likely helping customers with SEO services that require reports to demonstrate the value of your services.
For instance, retaining clients for a more extended period of time costs five times less than acquiring new ones. The key to success for any business is customer loyalty and providing high-quality services.
Pursuing new customers without retaining existing ones is a futile strategy. Reports can help clarify your services’ benefits because SEO is a long-term process.

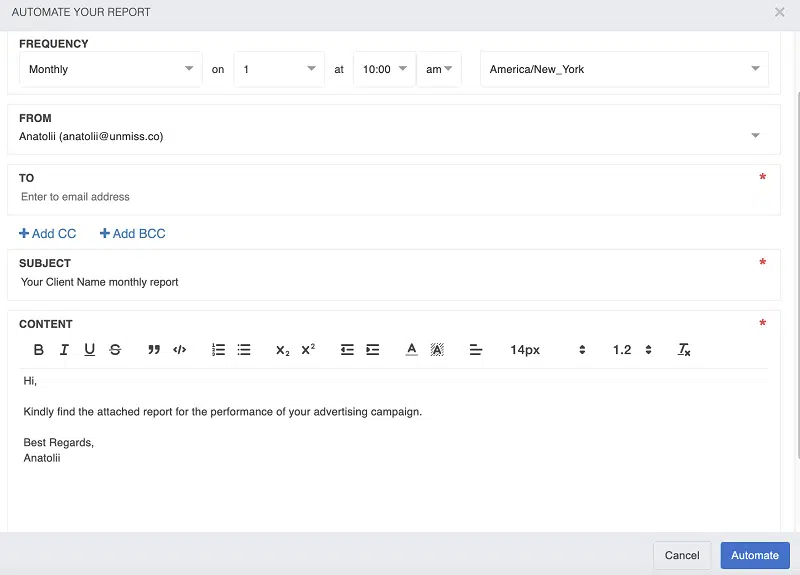
I use multiple tools to create attractive, easy-to-understand reports. The primary advantages of these tools are automation and the ability to save time by sending reports via email or sharing them on your website.
By relying on these tools, I can focus on providing high-quality SEO services, which helps to retain customers for several years and build strong relationships with them.
That is why it is essential to have a suite of tools to explain why working with you was the best decision ever. So let’s explore some tools that offer simple, easily digestible, and user-friendly reports.
1. Seranking
If you’re looking for a cost-effective solution that still delivers top-notch features, look no further than this tool. Simply log in or register, click on your user icon in the upper right-hand corner and select the “White Label” option.
With this tool, you’ll get all the benefits of a premium SEO platform without breaking the bank.

Open up a new window and you’ll see our header prominently featuring our company name and logo. It’s the perfect way to identify our brand and ensure you’re in the right place.
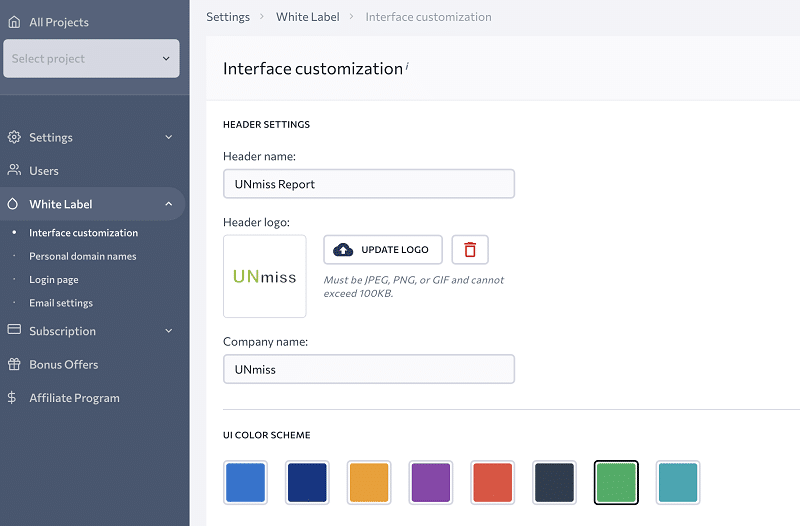
As you scroll down, you’ll find the rest of our website design, including our favicon.
If you’re not sure how to obtain a favicon from your own website, you can use the following link with your domain name to create one: https://www.domain.com/favicon.ico.
A favicon is a small but crucial element that helps users recognize your site and can also improve your search engine rankings.
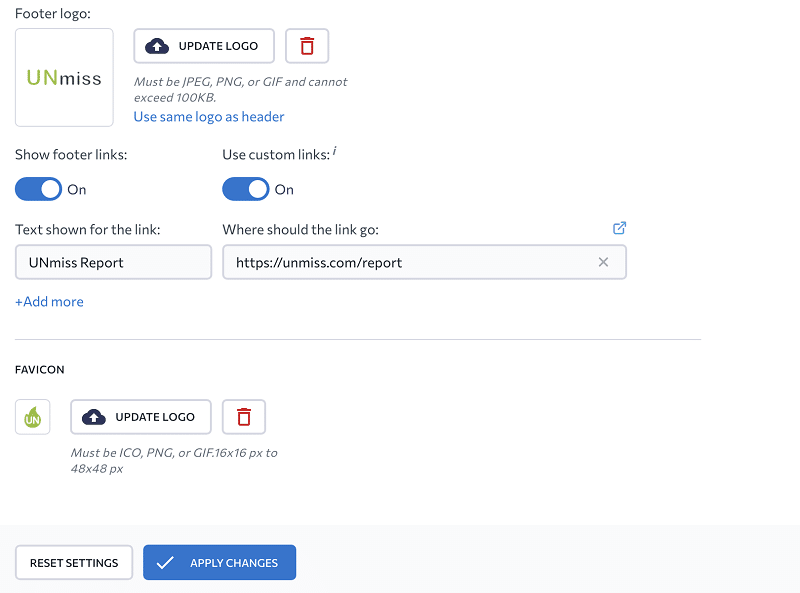
If you’re having trouble getting Seranking to recognize your favicon in ICO format, don’t worry – there’s an easy workaround. Simply use a tool like Cloudconvert to convert the file to PNG format, which should do the trick.
Once you’ve got your favicon sorted out, it’s time to move on to personal domain names. This involves filling in your name and URLs, which can help boost your online presence and make it easier for people to find you.
With these steps completed, you’ll be well on your way to optimizing your website for SEO success.
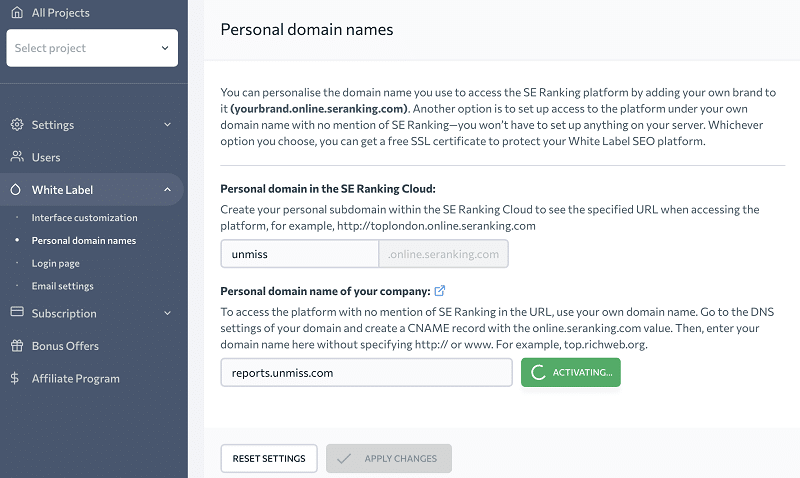
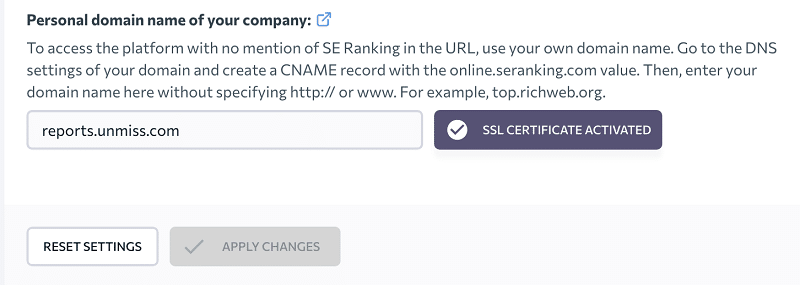
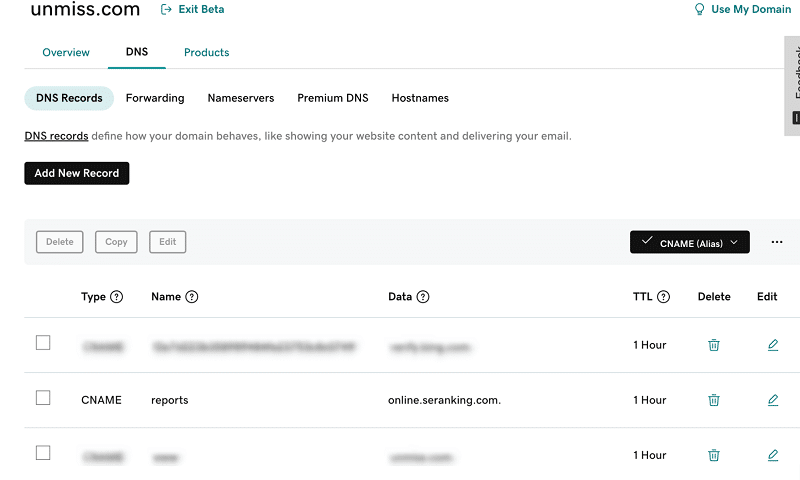
After you’ve filled in your name and URLs, the next step is to add CNAME data to your domain registrar.
This involves configuring your DNS settings to point to the appropriate CNAME record, which can be done through your domain registrar’s control panel.
In my case, I added the CNAME data to Godaddy, but the process may vary depending on your registrar. Once you’ve added the CNAME data, you’ll be one step closer to optimizing your website for SEO and improving your online visibility.
Add your logo on your login page, which can help establish brand identity and build trust with your users.
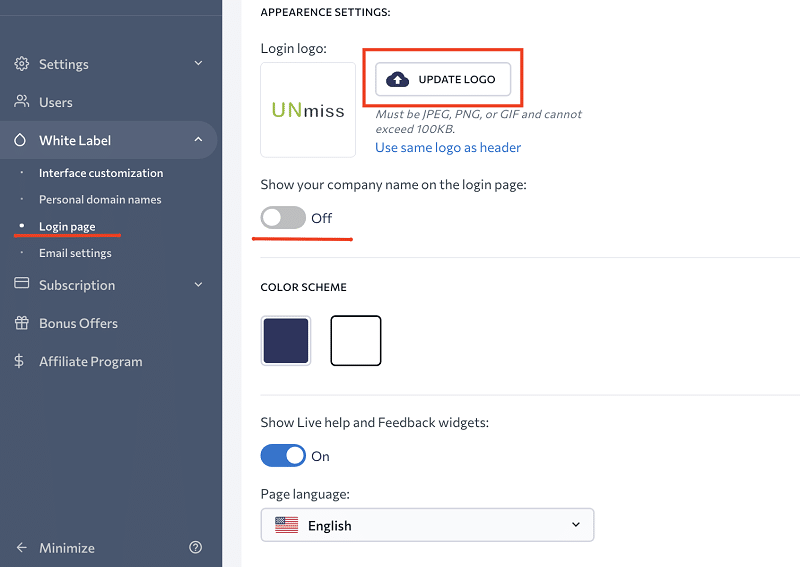
I got a login page on my website:

I turned off email settings because I couldn’t set them up a few times.
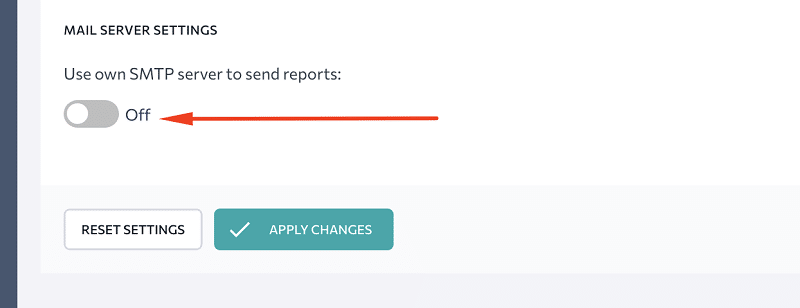
Something was wrong with the SMTP settings.

If you need a response, don’t hesitate to keep trying or contact the support team.
In my experience, I didn’t receive a response, but your mileage may vary. Regarding sharing reports, sharing access to your domain is much more effective than sending reports by email.
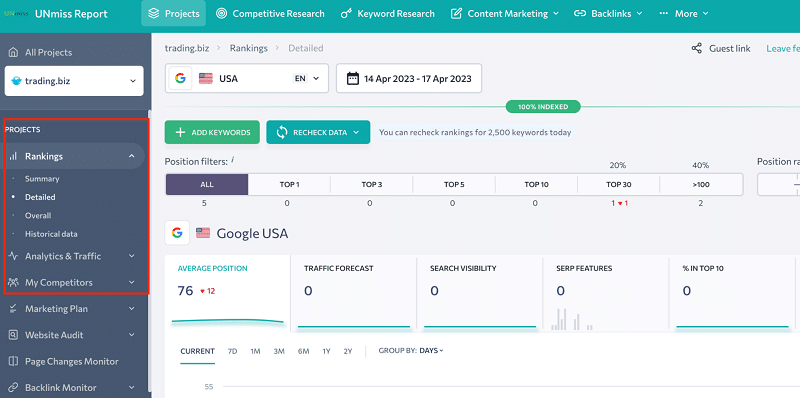
If you want to share a link with reports on your domain with your customers, the following features offer guest links: Rankings, Analytics & Traffic, and My Competitors.
These guest links can be a helpful way to share relevant information with your clients without manually sending reports via email.
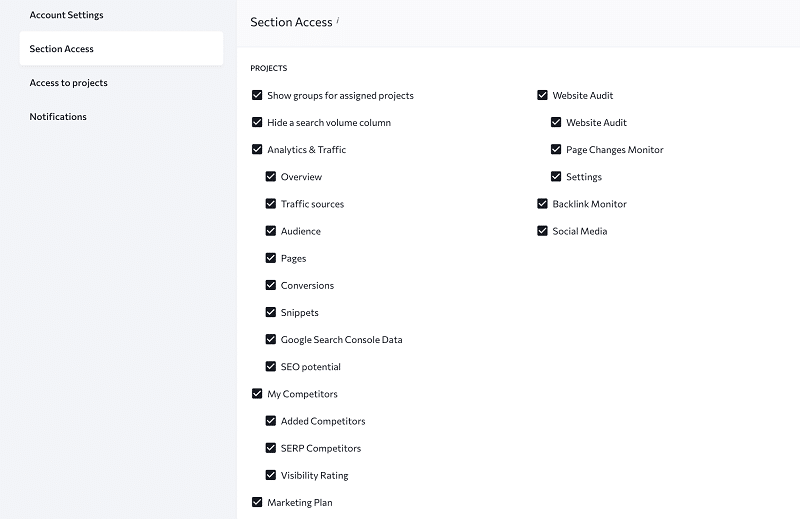
Creating a new user can be an effective way to give your clients access to all of your website’s features. To create a new user, simply click on the right side of your profile and select “Users”.
This will allow you to add a new user and assign them specific roles and permissions. By doing so, you can give your clients the level of access they need to manage their accounts effectively.
Whether you’re working with multiple clients or just one, creating new users can be a useful tool for collaboration and ensuring that everyone has the access they need to get the job done.

When creating a new user, you can choose to give them full access to all features or select specific ones based on their needs.
This allows you to tailor the level of access for each user and ensure that they have the necessary permissions to manage their accounts effectively.
There are a lot of great features:
- keyword rank tracker: average ranking, forecast, visibility, a percentage in the top 10
- keyword research
- website audit
- competitor analysis
- marketing analysis
- backlink checker.
White labeling can be a valuable tool for SEO agencies, webmasters, and resellers. With white labeling, you can use your own domain, manage users, and send reports from your own email or cloud storage.
What’s more, if you already have a Seranking subscription, you can take advantage of these features without paying extra fees.
Starting at just $41 per month if you pay for a year, Seranking offers a range of affordable pricing options to suit your needs.
With white labeling, you can customize your reports and give your clients a professional-looking experience that showcases your brand.
Whether you’re managing multiple client accounts or just your own, white labeling can be a powerful tool for improving your SEO efforts and streamlining your workflow.
There are a couple of drawbacks to note. Firstly, the product has limited features regarding guest links for customers, and secondly, it provides fewer data than the second reviewed tool, Semrush.
However, the product does offer some great features and a low price that is worth considering.
2. Semrush
This tool is the most favored among customers, with over 10 million users having tried it, out of which 500K are active, and 100K are paid subscribers.
The company’s impressive customer monetization rate of 5% since its inception speaks volumes about its effectiveness in SEO.
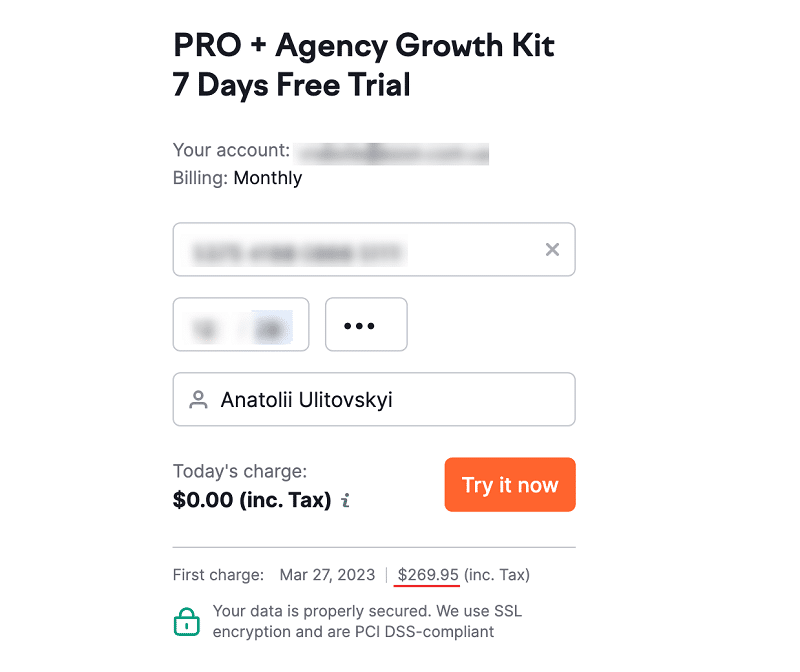
To access the White Label feature, you must sign up for the Agency Growth Kit, which offers a free trial that I plan to use.

If you don’t have a paid subscription to Semrush, the initial cost for using their service is $269.95.
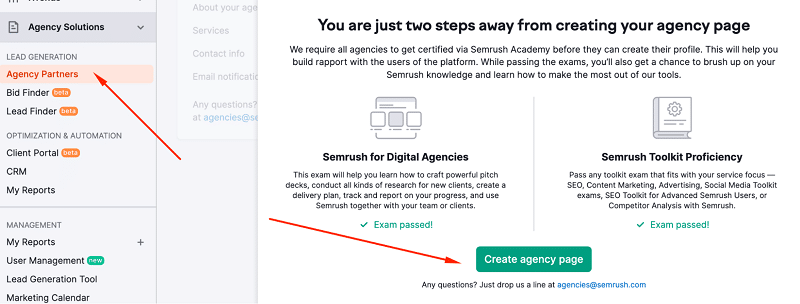
To create an agency page on Semrush, you are required to pass a few exams beforehand.

In case you don’t pass the exam on your first attempt, don’t worry as you’ll have a few more attempts. If you find the exam challenging, you can try searching for the answers on Google.
Just search for the name of the exam along with the keyword ‘answers.’ However, please don’t mention that I suggested this to you. Nonetheless, you must receive this message:

The final destination is to create an agency page.
Upon submitting the new form, the following message appeared.

So I tried again. It works. To approve the white-label reports, I had to reload and resubmit the page, which was quite time-consuming. Now that the reports are approved, the next step is to navigate to “My Reports” page.
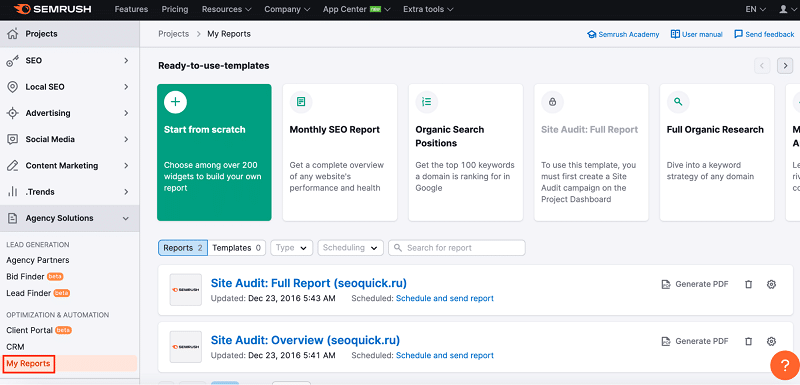
Learn from suggestions.

I received a customizable report that contained only the essential information relevant to my clients without any unnecessary fluff. Below is a comprehensive list of metrics that you can include in your report:
- Domain Analytics
- Keyword Analytics
- Backlink Audit
- Position Tracking
- Site Audit
- On-Page SEO Checker
- Social Media Toolkit
- Facebook Ads
- Google Analytics
- Google Ads
- Google Business Profile
- Google Search Console
- Listing Management
Each group consists of many subgroups that consist of more subsubgroups. For example, Domain Analytics consists of overview, organic research, backlinks, advertising research, PLA research, traffic analytics, keyword gap.
Organic research consists of summary, keywords by country, traffic organic vs paid, keyword position distribution, top competitors, competitive position map, organic branded search summary, branded vs non-branded, branded traffic trend, positions summary, traffic keywords charts, and positions.
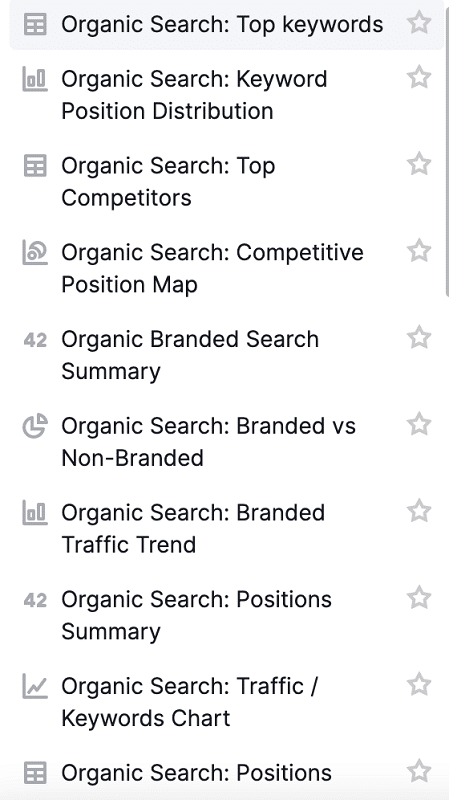
You can share almost all marketing metrics if you have such picky clients. Here is an example of Organic Search: Keywords By Country
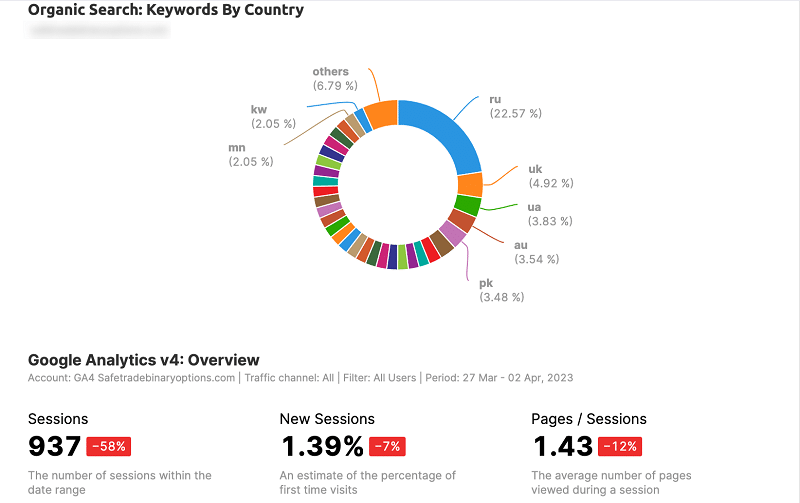
Semrush provides a time-saving feature that allows you to send reports directly from your email by setting it up manually. Additional settings include text formatting options such as font size, styles, text alignment, as well as images, lists, and more.
The monthly cost for Semrush starts at $99.95 when paying for a year and includes a limited free version. However, to access the White Label features on your agency kit, you must pay $150 monthly.
There are a few drawbacks. Firstly, the setup process is time-consuming, and the product can be quite costly.
Additionally, there are no options for domain sharing and report translation for non-English languages. However, the product does offer some impressive features that are worth considering.
3. Webseo
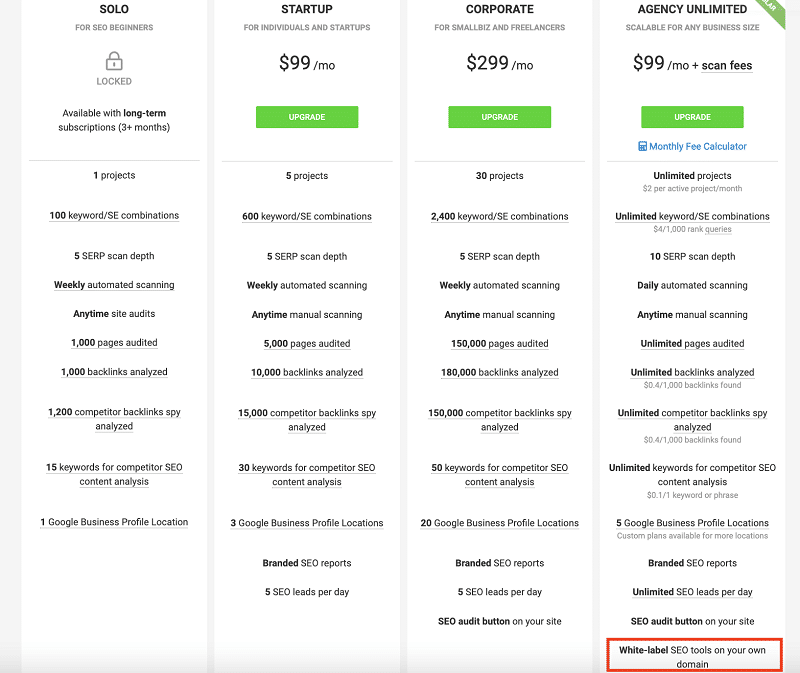
This tool does not offer a free trial for White Labels. To access it, a payment of $99 is required. Here’s a tip: like I did, you can inquire about a free trial via chat to secure ten free days. This period should suffice to evaluate this tool.
There are numerous search engines that allow you to track your website’s ranking positions across various devices.
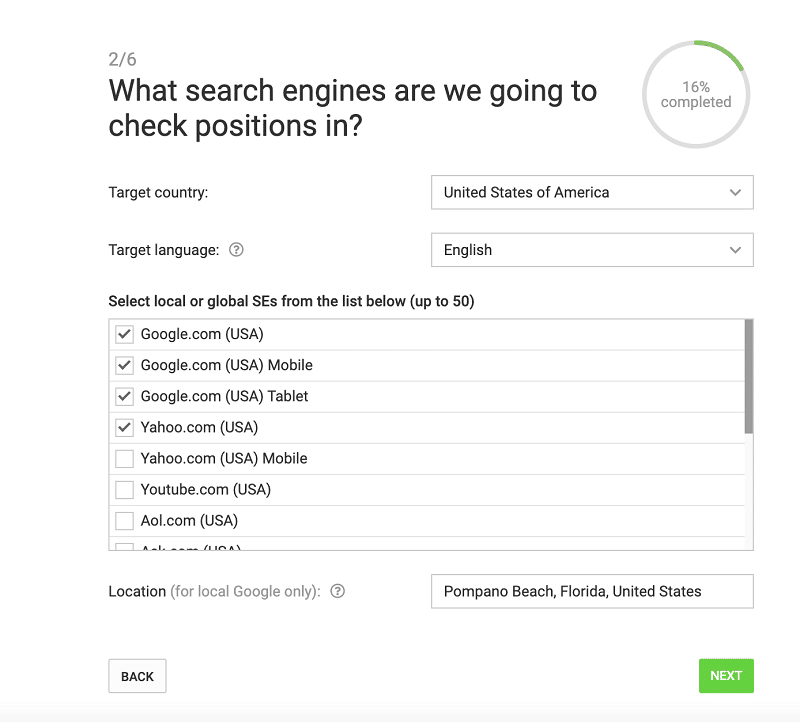
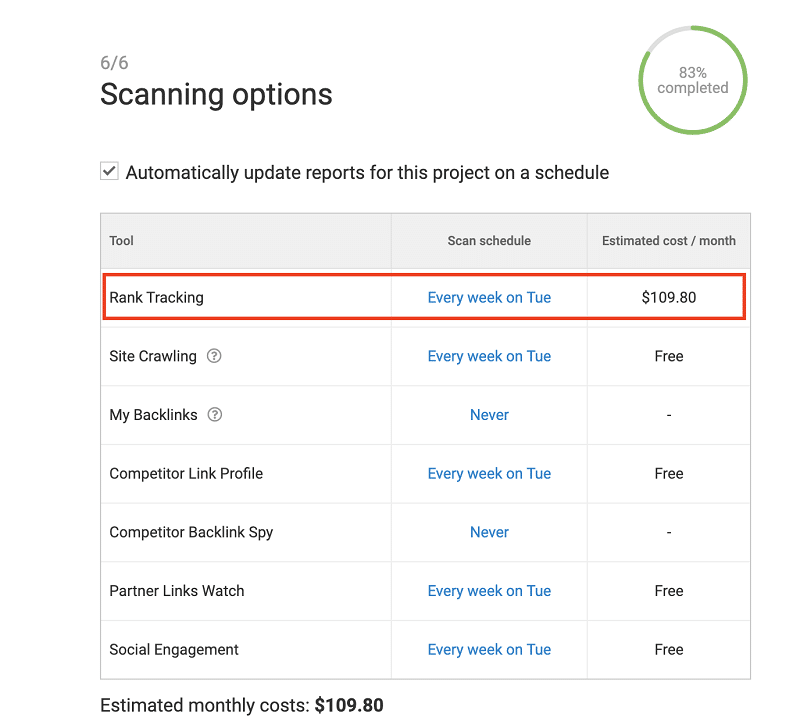
To track your website’s keyword ranking, you will need to pay an additional fee. In my case, after adding a substantial number of keywords, the estimated cost came to $109.8.
Once you have paid for the keyword tracking service, you can set up reports on your own domain at https://tools.yourdomain.com/.
This will allow you to customize the reports with your own logo, header, footer, and color scheme using the following process:
- Set up a subdomain with a single sign-on (SSO) and API
- Grant access to your customers or subscribers
- Build different access levels and scan limits.
By providing access to your tool through this link, you won’t need to send custom reports as all the necessary information will be readily available.
This tool is particularly useful for freelancers, SEO agencies, and resellers, as it offers a wide range of features such as rank tracking, keyword research, site audit, content assistant, internal and external link checking, toxic link checking, content submission, social analytics, competitor analysis, and email alerts.

Webceo utilizes data from Majestic and Moz for backlink analysis, but its technical SEO features are relatively basic when compared to other multifunctional tools.
The monthly subscription fee for Webceo is $99 ($83 if paid annually), with an additional cost of $20 for white-label features and $2 for each active project.
Overall, these prices are reasonable.
4. Woorank
This tool offers a user-friendly design and analyzes websites starting from their homepage.
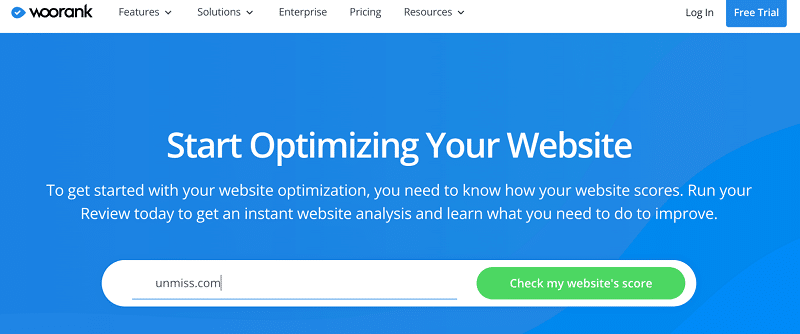
After using this tool to analyze my website, I received an 80% score along with hidden insights that require a two-week free trial to access.

Once you have completed a straightforward form, you will be required to add your payment method.
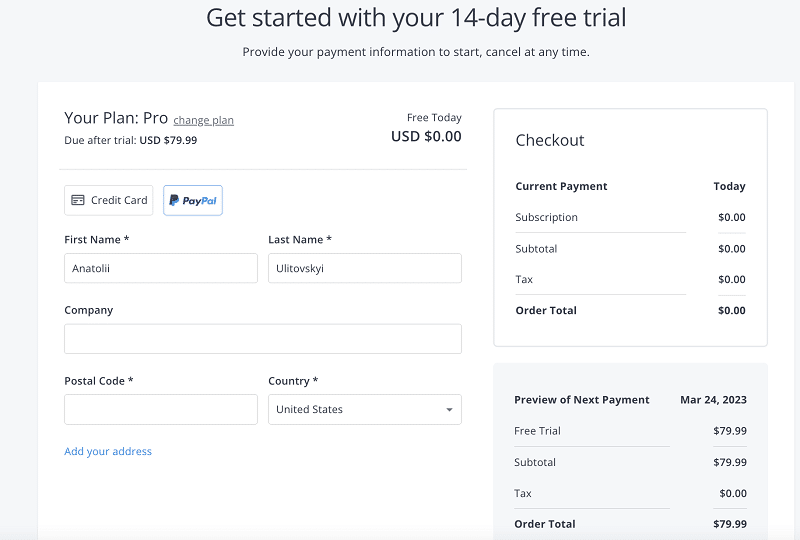
Great! After submitting your payment information and requesting another analysis of your website, you have received a comprehensive structured audit.
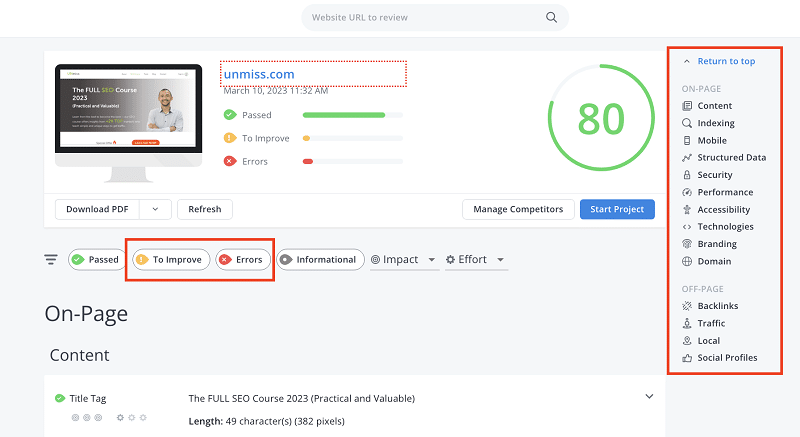
When reviewing the structured audit, focus on the yellow “To improve” and red “Errors” sections to identify areas that need attention.
However, keep in mind that not all recommendations may apply to your specific website. For example, if your homepage does not include Twitter sharing, you may not need to worry about Twitter card recommendations.
One of the most important aspects of the audit is the backlink analysis, which shows the number of backlinks without providing further insights.
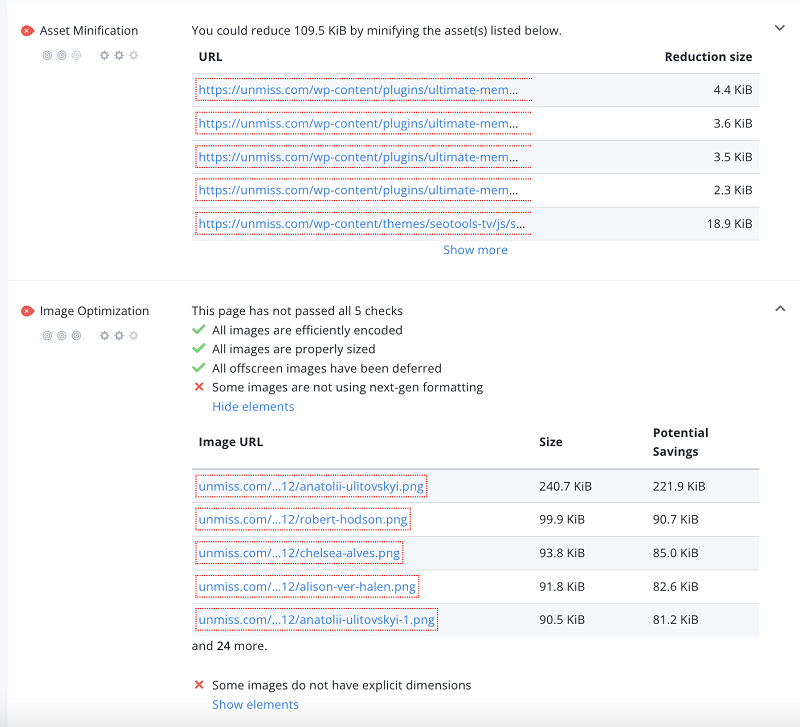
Another helpful recommendation is regarding file and image compression, which can improve website loading speed.
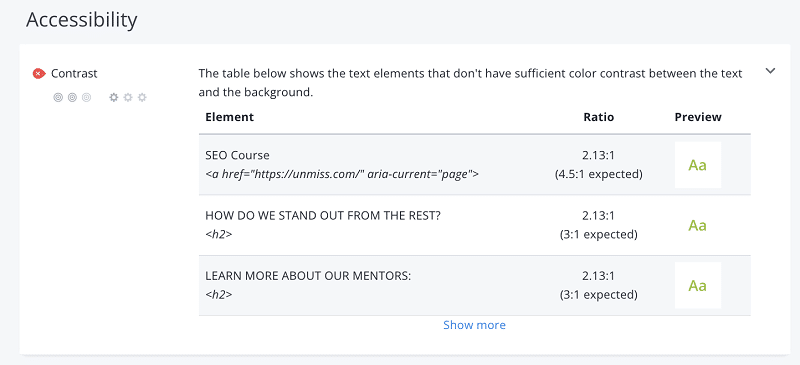
It’s great to hear that you received useful tips regarding contrast, which can significantly impact the user experience (UX).
Good contrast between text and background colors can make content more legible and easier to read, enhancing the overall user experience.
It can be frustrating that you cannot download just the yellow and red highlights in PDF format. As a result, responsible specialists must search through a large file to find the required information.
On the other hand, Woorank claims to offer full customization and essential parameters, which may not be available on other tools.
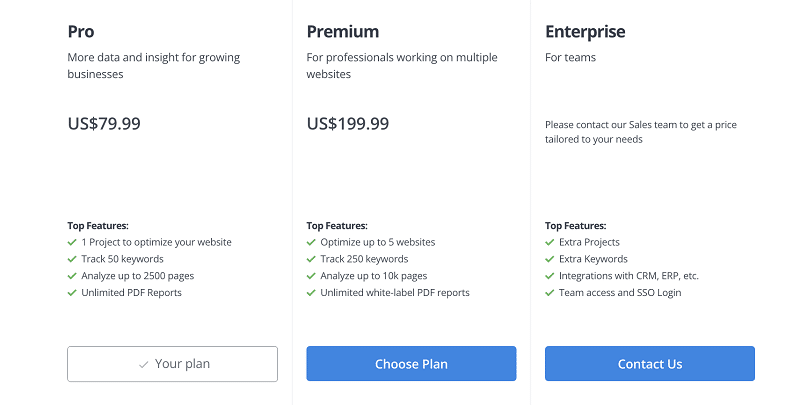
However, it’s important to note that white labeling is only available in the Premium plan, which costs $200, making it quite expensive for some users.
If you don’t track keywords regularly, an alternative tool like Screaming Frog may be a more cost-effective option as it offers page analysis for up to 10K pages at a lower price.
Fortunately, if you have not paid for the tool yet, you can cancel the subscription without incurring any charges. It’s always a good idea to try out a tool first before committing to a subscription, especially if it comes at a high cost.

Based on your experience, it seems that Woorank may be overpriced for the features it offers. While it has a user-friendly interface on the homepage, the admin panel may have small fonts that could be difficult to work with.
5. Mysiteauditor
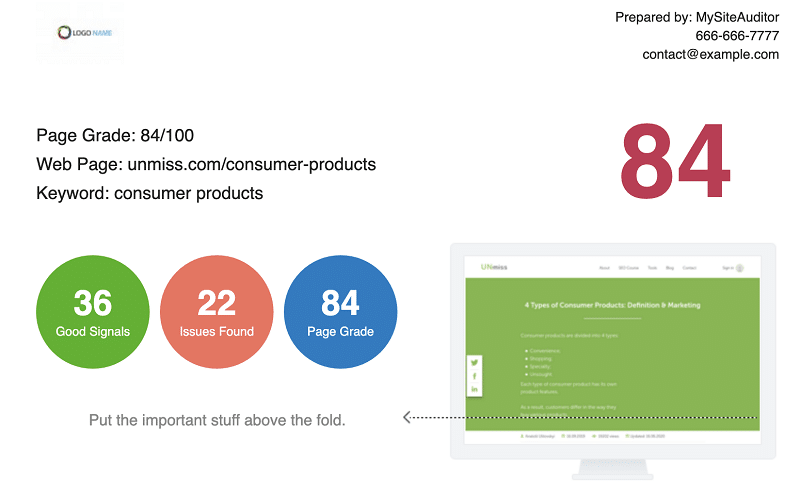
Great, let’s get started! I decided to check the keyword “consumer products”.

My score is 84, which is not bad.
The error message about too many file requests can be vague as it does not provide specific guidance on how to fix the issue.

I couldn’t agree with the following recommendations. It depends.
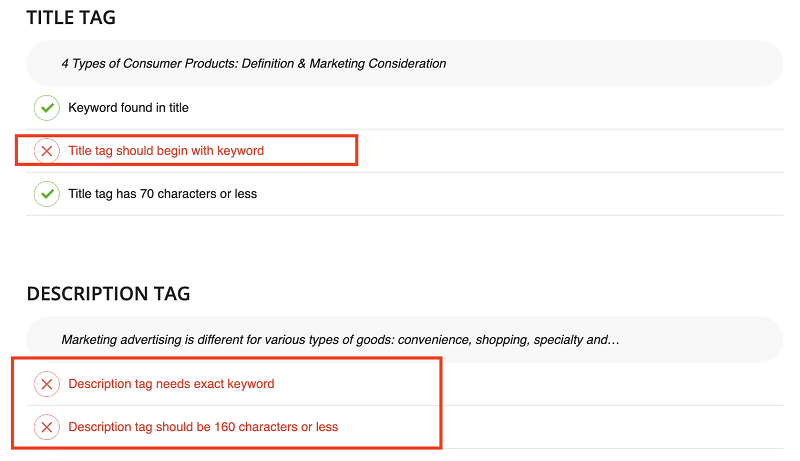
The other recommendations for rest are pretty basic. Most free or freemium tools tend to share a lot of data, which is not very useful.
The primary objective of this tool is to help you generate more leads by adding code to your website. However, I had trouble figuring out how to do this. Despite my initial difficulties, I decided to give the tool another chance and signed up.
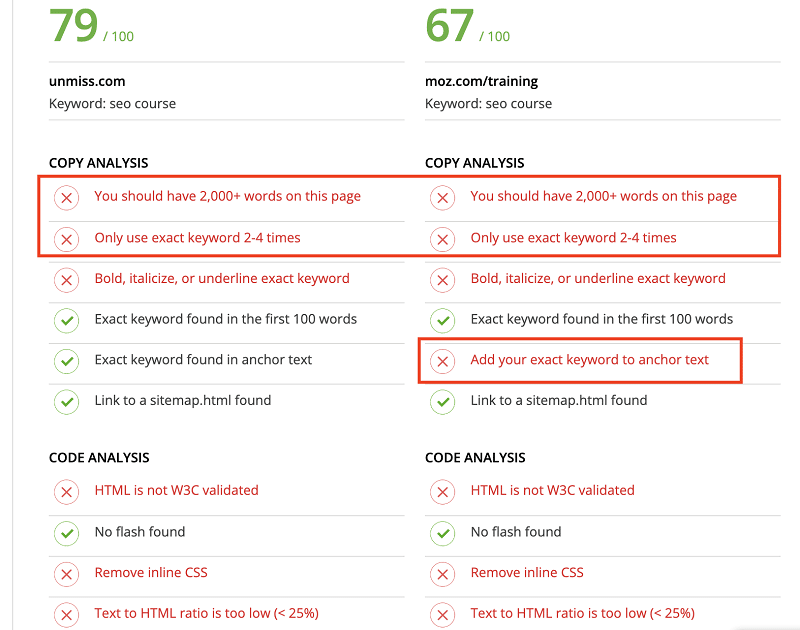
To evaluate the tool’s effectiveness, I compared one of my website’s pages with a similar page on Moz.com, one of the best SEO tools available.
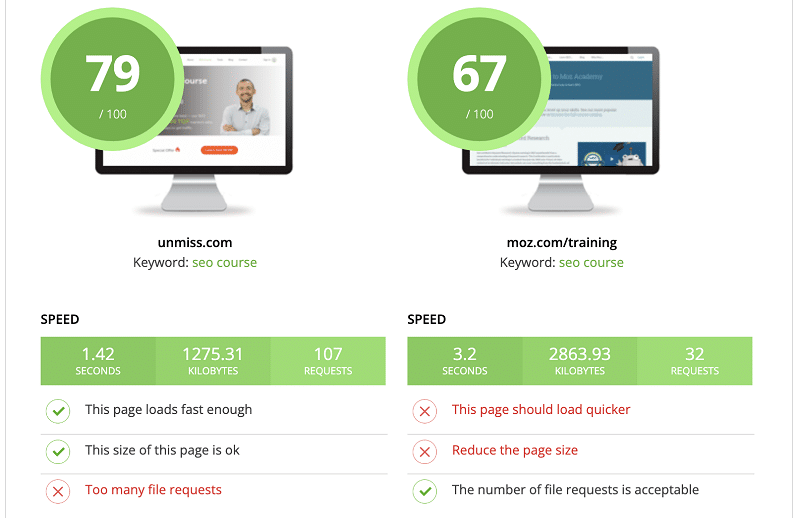
I was pleasantly surprised to discover that my page had a better score than the equivalent page on Moz.com. It seems that Moz.com may not place as much emphasis on this particular metric or on obtaining recommendations.
While some of the tips provided by the tool were useful, it was challenging to apply them to specific content elements. For instance, I found it difficult to identify which images needed fixing.
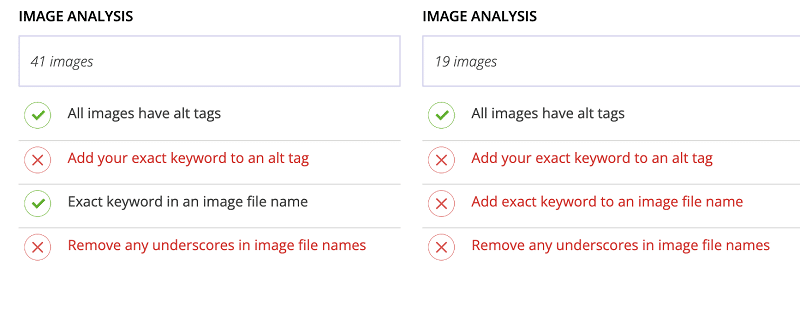
I found many of the tool’s tips to be outdated or based on average data. For example, the tool recommended having 2,000+ words on a page or using exact keywords 2-4 times, which is nonsensical.
The optimal number of words on a page depends on the user’s intent and purpose, and keyword density is an obsolete concept in today’s SEO landscape.
The starting monthly price for this tool is $39, which is not bad and affordable.
6. Rankranger
If you’re interested in tracking keywords for local SEO and Google Ads, you might want to try out this helpful tool. Personally, I typically rely on Google Search Console for analyzing keyword rankings, but I’m always open to testing out new options.
One thing to keep in mind is that this tool does require filling out several fields. While I prefer to keep things simple, the information gathered from these fields can provide valuable insights into your keyword performance.
So, it’s worth taking the time to input the necessary details.
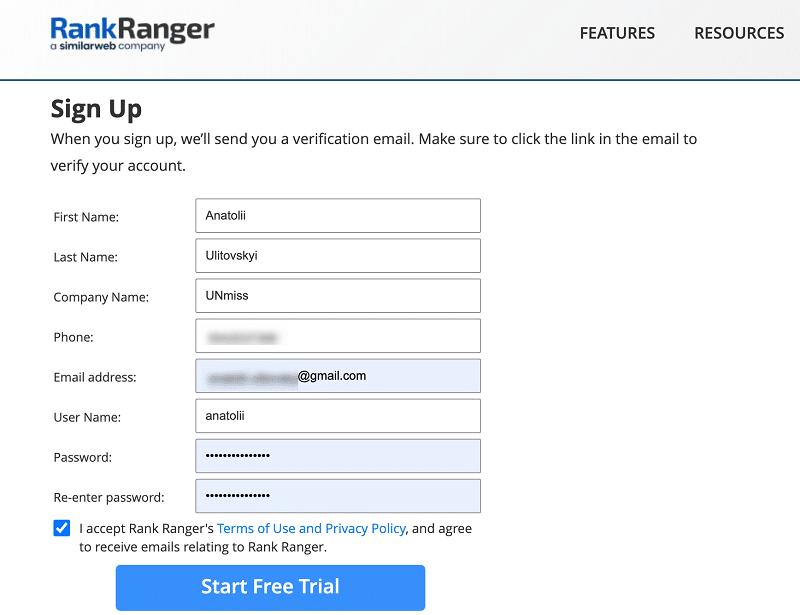
After confirming my email, here’s a bonus message.

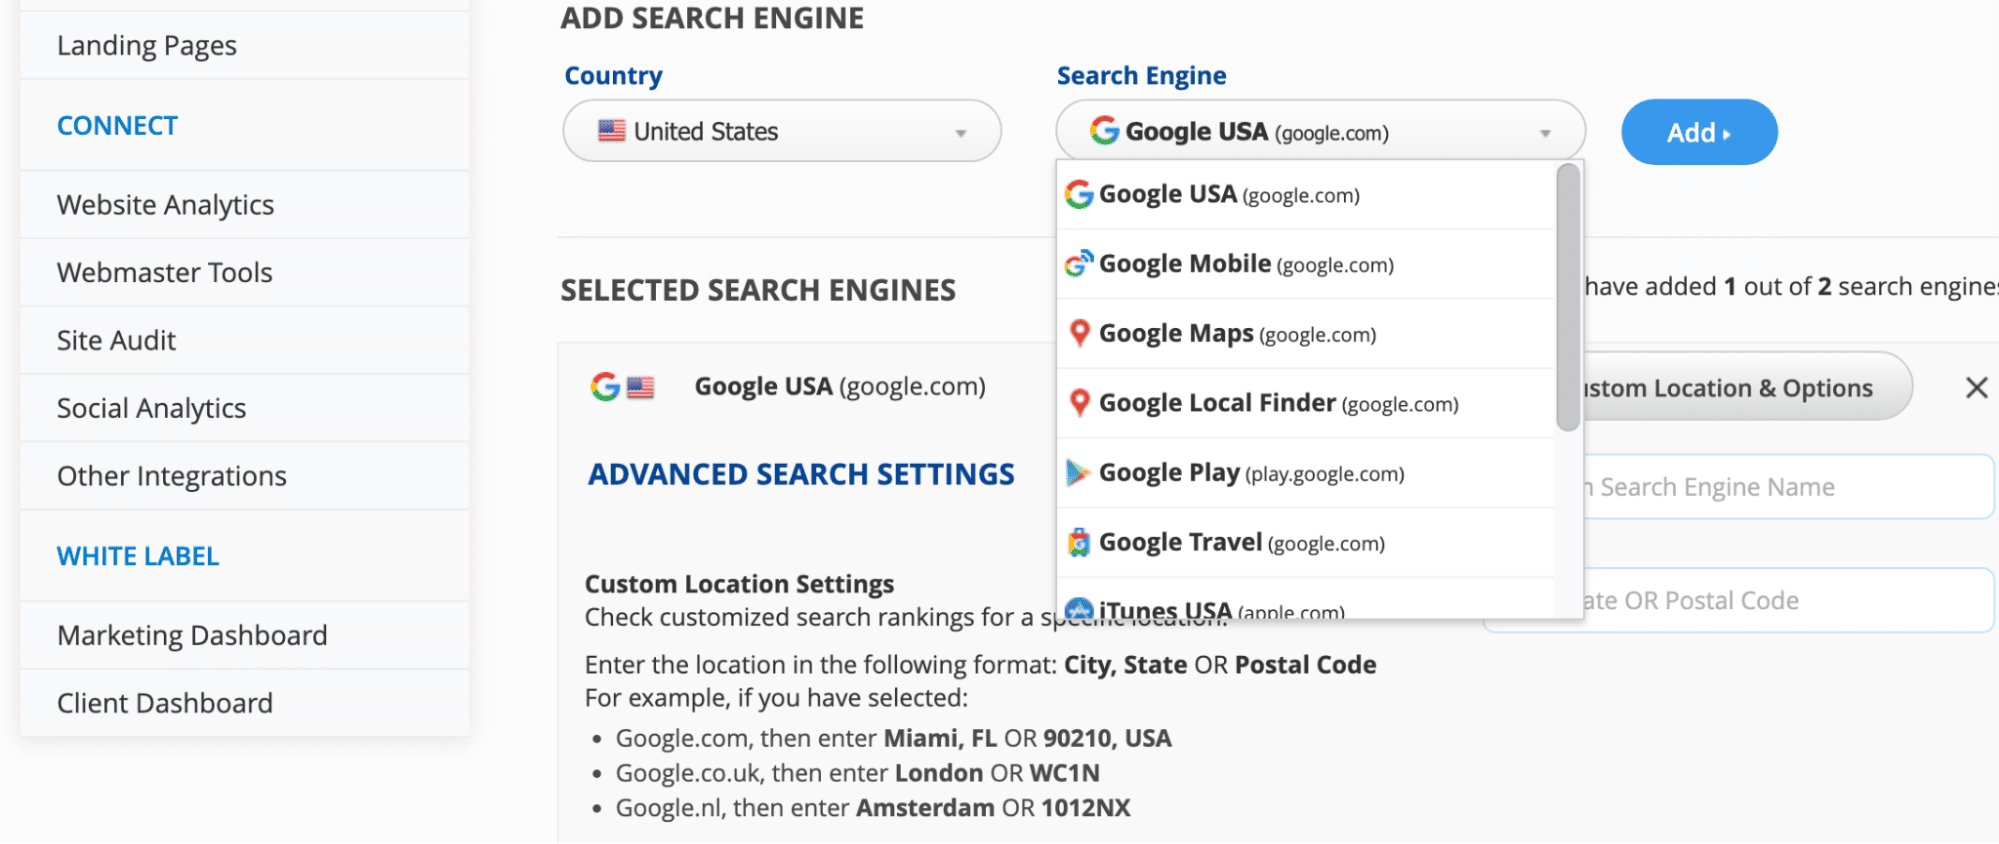
There are many options available for choosing search engines and locations.
I added popular keywords from my Google Search Console to compare the results with those from this tool.
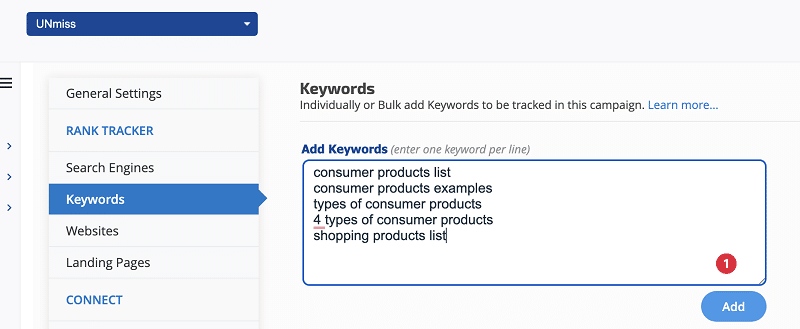
I didn’t receive any data or explanation regarding the time it takes to retrieve the results.
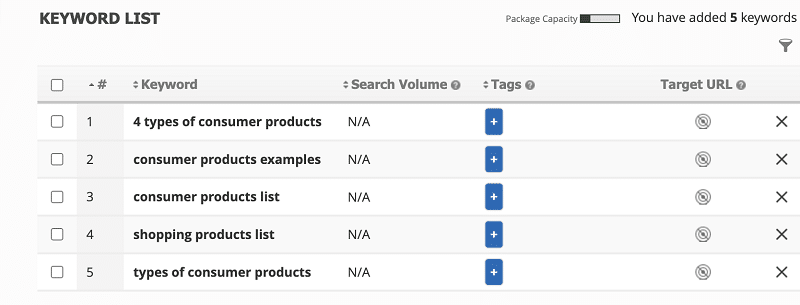
To retrieve the data, you need to click on the “View Reports” button.
It took around 30 minutes for me to retrieve 80% of the results. If you have the time and need to check the data on a daily basis, this may not be a big issue.
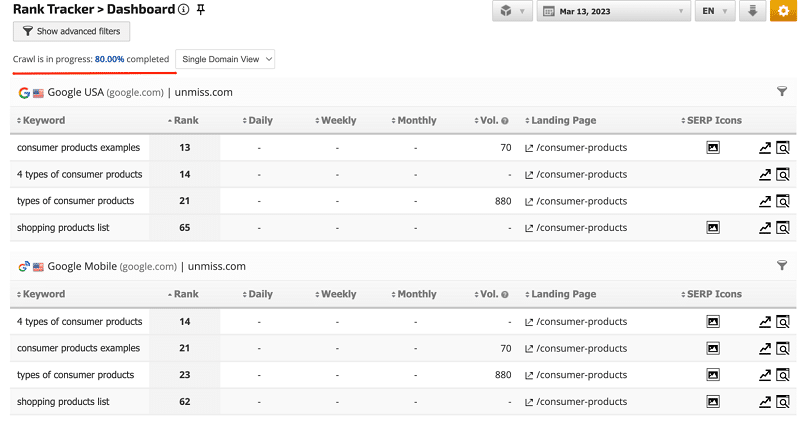
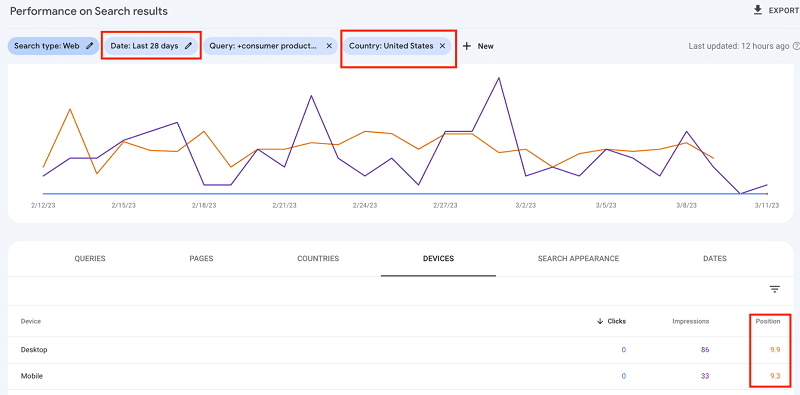
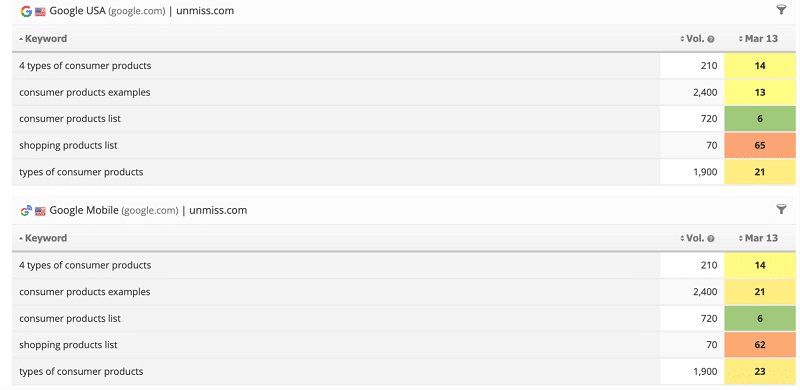
According to the Google Search Console, the ranking positions for the following keywords are as follows:
- “consumer products examples”: 9 for mobile and 9 for desktop
- “4 types of consumer products”: 5 for mobile and 7 for desktop
- “types of consumer products”: 6 for mobile and 10 for desktop
- “shopping products list”: 9 for mobile and 9 for desktop
I analyzed the data from the last 28 days, and while results may differ depending on the date range selected, in this specific example, there wasn’t much variation.
RankRanger provides user-friendly charts and additional features such as tracking fluctuations, SERP features, Featured Snippets, local results, video rankings, Google Search Console integration, and meta tag analysis.
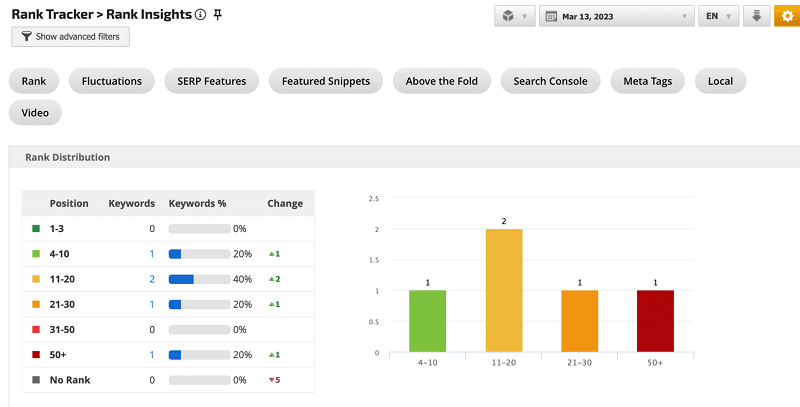
Find the volume and the average data.

You can get fluctuations if you check out for a long time.
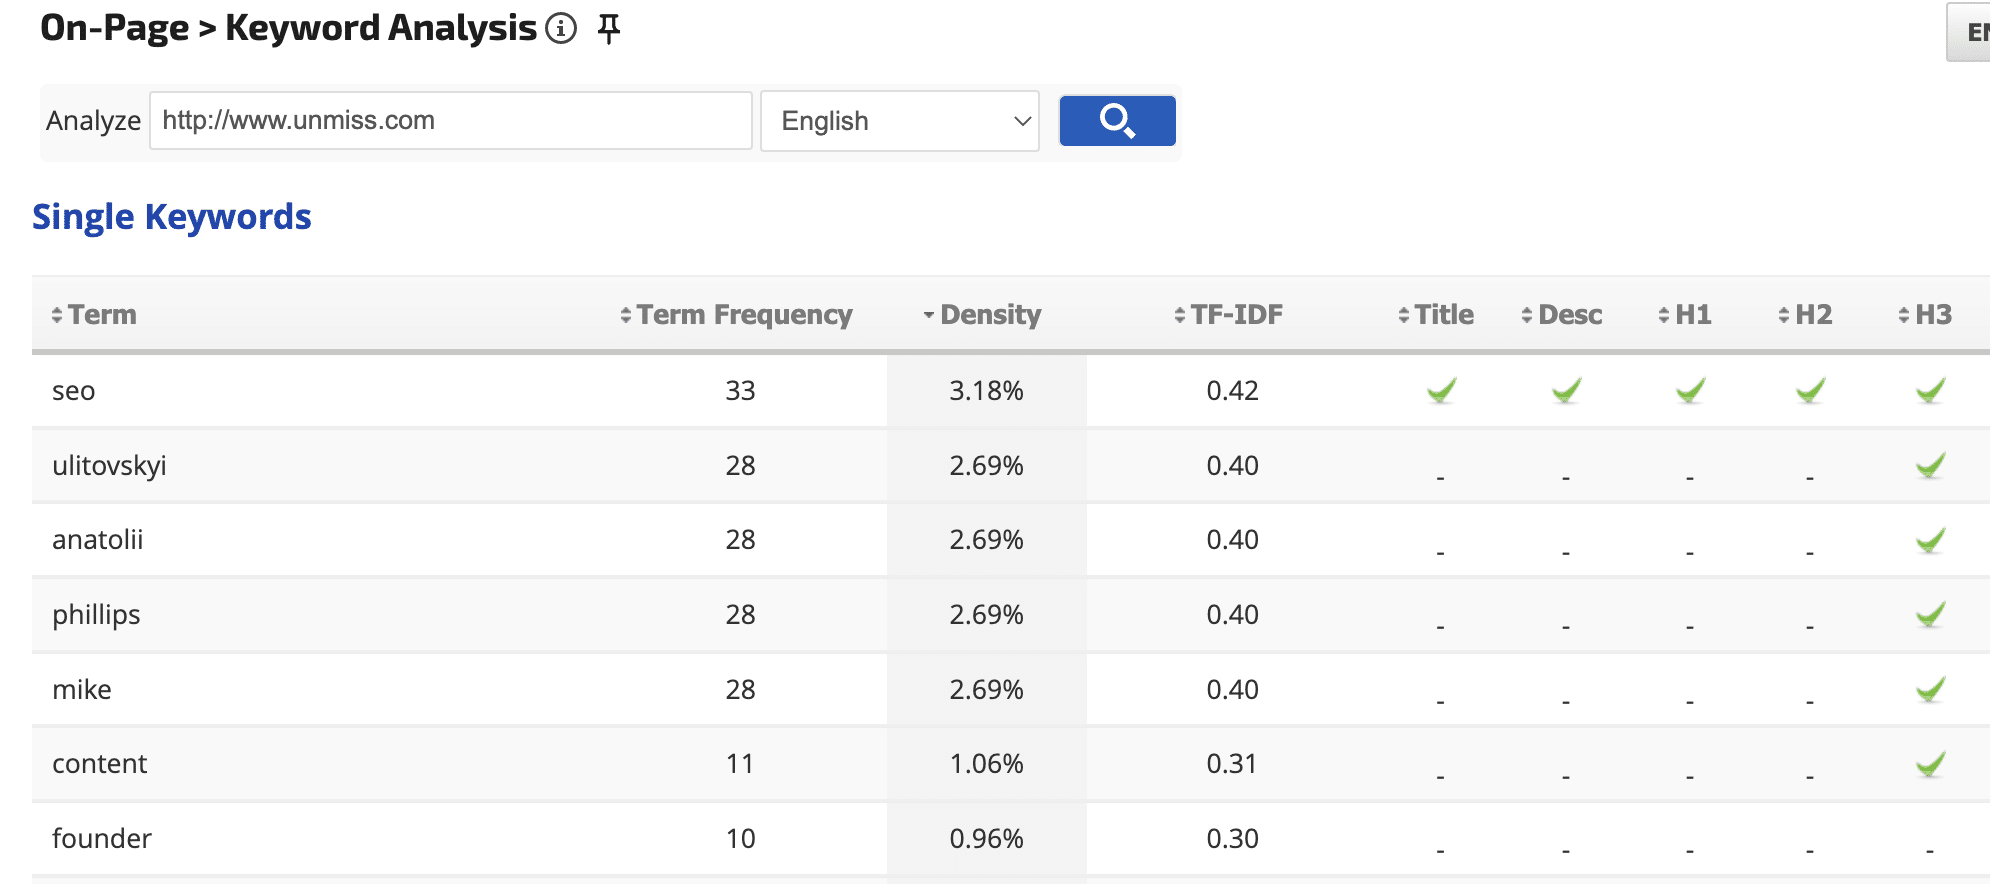
Some features are obsolete, e.g., keyword density for single keywords and 2, 3, 4 words phrases.
If you’re looking to track keyword ranking positions across multiple search engines and devices, this tool may be a good option for you.
Additionally, the white label feature allows you to customize the admin panel with your website’s branding for clients. You can check out an example of this on their website.
The starting monthly price for this tool is $79. While I personally won’t be using this tool, if you need to track keyword rankings, it may be worth considering for your needs.
7. Reportgarden
While this tool promises to provide customized reports and a simplified user experience, the registration process requires filling out five fields, which can make things a bit more difficult in the beginning.
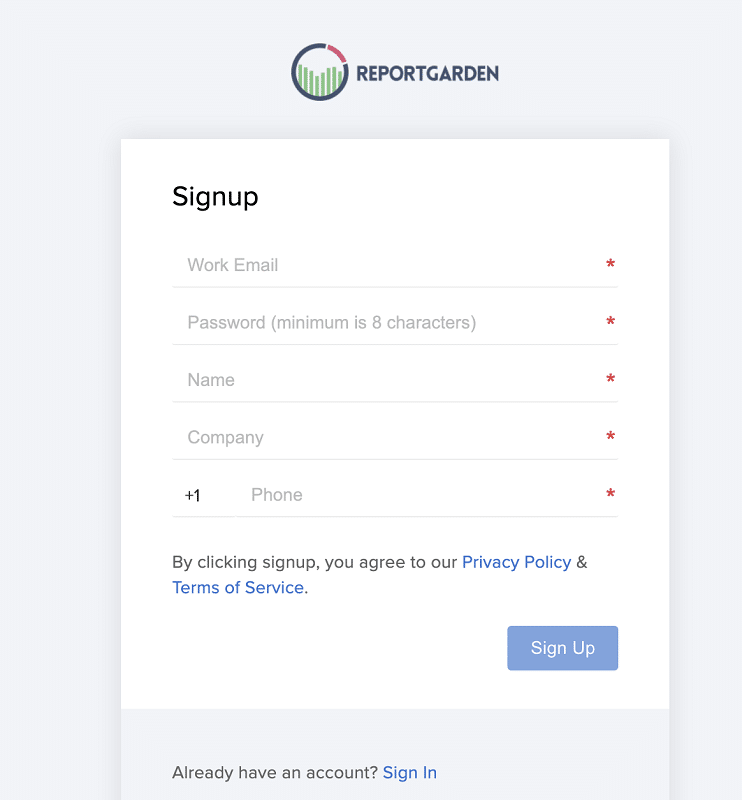
After annoying registration, we can move forward with your evaluation of the tool. Just keep in mind that the trial period will expire in 7 days, but if you only need it for a few minutes, that should be enough time to explore its features.

It’s great to hear that you found the interface user-friendly and were able to explore the four SEO reports provided by the tool. The ability to customize the infographics is also a helpful feature.
Connecting your Google Analytics account and customizing reports can provide even more valuable insights. The ability to rename metrics is a unique feature that can be particularly useful for meeting the specific needs of clients.
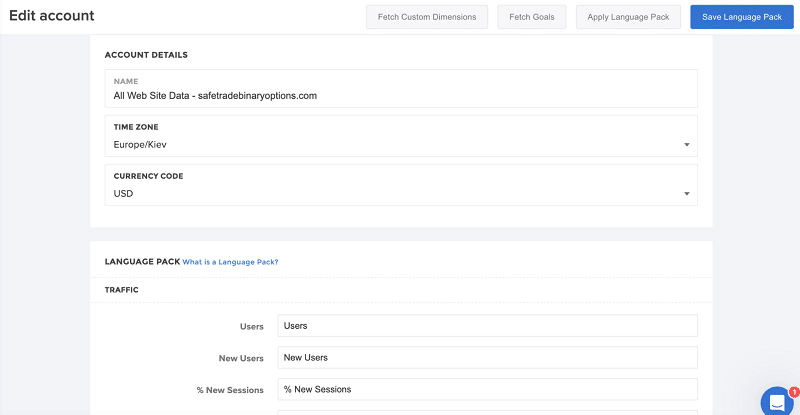
In addition to customizing metrics, this tool also allows for customization of fonts, sizes, and widgets.
If you have customers who require this level of customization and would like to receive reports via email, then this tool may be a good fit for your needs.
The basic monthly subscription for this tool starts at $89. Not bad.
8. Accuranker
This tool is ideal for anyone who needs to track their website’s ranking on Google, Bing, Youtube, and Baidu for mobile, desktop, and local searches, as well as monitor SERP features.
It also allows you to track how ranking positions change over time, which can help you stay ahead of your competitors by updating your content and link-building campaigns accordingly. Here are some additional features that this tool offers:
- Monitor the ranking of 10 competitors for each domain
- Group keywords with tags and filters
- Analyze your market share
- Check out the history of search volume
- Google Analytics and Search Console integration
- Adobe Analytics integration
I highly recommend this tool for webmasters who experience high volatility on Google due to frequent content updates from competitors. The monthly price for this tool is $116 for 1,000 keywords if you pay for a year, or $129 monthly.
9. NightWatch
This tool is an excellent choice for tracking local SEO keywords on Google, Bing, and DuckDuckGo as it covers more than 50,000 locations worldwide. Simply add your zip code and keywords to get accurate ranking positions.

In addition to tracking rankings, this tool also offers the following features:
- Keyword suggestions
- Website audit: checks for broken pages, missing tags, and links using automated crawling.
The monthly subscription fee for this tool is $32 if you pay for a year, or $39 for monthly payments.
10. Wincher
This tool provides daily tracking of keywords along with keyword research and competitor analysis to help optimize website pages. The interface is simple and user-friendly, and the tool offers the following features:
- Monitor ranking keywords for all website pages
- Analyze the ranking history
- Share access with an unlimited number of users
- Get an overview of your competitors
- Find new keywords and receive suggestions
- Track local SEO rankings in 100,000 locations across 40,000 cities and 180 countries.
Although pricing is not openly advertised, you can try the tool for free to test it out.
11. Dashthis
This tool is a powerful all-in-one solution that combines more than 34 marketing analytics tools, including Google Analytics, Facebook, YouTube, and Instagram ads, into a single report.
It also provides data visualization reports that include KPIs for both SEO and PPC.
Some of the popular features of this tool include:
- Display reports on your own domain
- Automated email PDF reports
- Customizable report templates.
The monthly subscription for this tool starts from $33 if you pay for a year.
12. Reportz
This tool offers a comprehensive dashboard that combines data from various other tools and presents it with your logo and domain.
It can gather data from tools like Google Analytics, Search Console, LinkedIn, Instagram, Facebook, Google Sheets, WooCommerce, Ahrefs, Semrush, Serpstat, Seranking, and more.
The tool is user-friendly and straightforward to use on both mobile and desktop devices. Here are some of the popular features of this tool:
- Create comprehensive reports tailored to your specific needs
- Combine SEO and PPC metrics
- Use popular report templates
- Real-time updates
- Set up report automation
- Import data to CSV or PDF format.
The minimum monthly subscription for this tool starts at $7.95 for three reports if you pay for a year, or $9.94 for monthly payments.
13. Sitechecker.pro
This tool is designed to help you find technical errors on your website and provides on-page SEO recommendations. It also allows you to add your earned backlinks and analyze if they exist and react quickly if they disappear.
Additionally, the tool offers tracking for your ranking positions. Here are some of the key features of this tool:
- Find technical errors on your website
- Get on-page SEO recommendations
- Analyze the existence of your earned backlinks
- React quickly if backlinks disappear
- Track ranking positions
The monthly subscription fee for this tool starts at $41 if you pay for a year or $49 per month.
14. Siteauditor
This tool provides automated technical optimization analysis and flow integrations with Hubspot, Mailchimp, Pipedrive, and Intercom.
All you need to do is copy and add the code to your WordPress website page. Here are some of the key features of this tool:
- Automated technical optimization analysis
- Flow integrations with Hubspot, Mailchimp, Pipedrive, and Intercom
- Easy code integration with WordPress website pages
The monthly subscription fee for this tool starts at $39 if you pay for a year or $49 per month.
15. Posirank
This white-label SEO tool offers a unique service by providing regular SEO and PPC services under your brand name. These services include SEO management, PPC, guest posting, media coverage, local SEO, and website audits.
This tool can be particularly useful for resellers and digital marketing SEO companies that specialize in a specific niche but have a variety of clients. The pricing for this tool varies depending on the services ordered.
16. Cyfe
This tool offers a comprehensive dashboard that unites various analytics and sales channels, including Google Analytics, Facebook, Twitter, Instagram, LinkedIn, and more, in one place. It allows you to customize essential metrics to help you make quick decisions.
The white label feature allows you to use your own domain, and you can also send automated emails or SMS messages in multiple formats, including CSV, PDF, PNG, and JPEG.
The monthly subscription fee for this tool starts at $19 for a user with two dashboards.
17. Seoptimer
This audit tool provides a comprehensive analysis of your entire website and prioritizes what needs to be fixed with helpful visualizations and charts.
It’s crucial to set the right priorities when dealing with limited resources. The tool provides metrics in the following areas:
- On-page SEO
- Links
- Usability
- Performance
- Social
One of the benefits of this tool is that it can provide data in various languages, including Danish, Dutch, French, German, Italian, Norwegian, Polish, Portuguese, Russian, Spanish, Romanian, and more.
The white label feature allows you to set up reports on your website page and in PDF format with your logo, headings, and other customized elements. You can also schedule and customize reports, analyze competitors, keyword rankings, and more.
The monthly subscription fee for this tool is $29 for PDF format and $59 for website integration.
18. Brightlocal
This tool is focused on local SEO and provides a range of useful features, including a rank tracker, search grid, citation tracker, website audit, Google Business profile audit, review monitoring, and citation acquisition.
You can customize your reports by adding your logo and brand colors to maintain consistency across your brand. The monthly subscription fee for this tool starts at $29 per month, or you can get two months for free if you pay for a year.
19. Agencyanalytics
This tool offers a powerful solution by combining more than 75 different analytics sources, including Google Analytics and Search Console, YouTube, Amazon, Hubspot, Snapchat, Facebook, and more.
All reports are fully optimized according to your set preferences.

With the white label feature, you can share reports with your logo and brand colors on your domain, schedule emails, or even create branded apps. The monthly subscription fee for this tool starts at $10 if you pay for a year or $12 per month.
Conclusion
Every tool has advantages and disadvantages, and choosing the right tool depends on individual needs and preferences. I found success with Seranking and Semrush in providing value to my customers.
However, it’s always worth exploring other options and giving them a chance. By learning about their features, you may find a tool that better suits your needs or provides additional benefits.
Ultimately, the goal is to find a tool that helps you achieve your goals and provides the best value for your business.


